I love hand-blown eggs for Easter.
You can enjoy them year after year, and
they make great gifts.
Here's what you'll need to make your own hand-blown eggs:
eggs
a bowl for the yolks
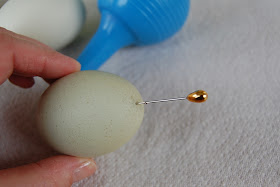
a corsage pin
a nasal aspirator [preferably new :)]
This year I got some beautiful blue eggs from a friend,
thank you, Bekah.
Use the corsage pin to poke a pin hole in each end of the egg.
Make the hole a little larger on the bigger end of the egg.
Swirl the corsage pin inside the egg to break the
yolk and mix with the egg white.
Using the nasal aspirator on the end with the small hole,
blow the yolk and egg white through the bigger hole.
{Use slow, steady pressure; the egg can break with too much air pressure.}
After all of the insides are removed,
rinse out the inside of the egg with water.
rinse out the inside of the egg with water.
You can insert some water with the aspirator, shake and
then blow out the water. Allow the egg to air dry before decorating.
then blow out the water. Allow the egg to air dry before decorating.
I usually wait at least a day before decorating.
Decorate as desired . . . paper mache, glue on flowers, buttons, etc.
or color as you would a hard-boiled egg.
{You will need to remove any colored water from the inside and allow to dry.}
Here are some pretty eggs to inspire you.

I just love this romantic Easter egg created by the talented
Rosemary at Ozma of Odds.
She used a paper mache egg with petals and pins,
but you can use glue to apply petals, pearls She used a paper mache egg with petals and pins,
and other pretties to hand-blown eggs.
And . . . how about these beautiful eggs adorned
with buttons, lace and pretty jewels?
Made by Becky at Junk to Joyand
love this idea of displaying eggs in silver candle holders
shared by Tammy at Beatrice Banks.
I gave it a try with some blue eggs . . .
Have fun decorating your eggs for Easter.
Wishing you a blessed Easter week.
Linking with:
http://somedaycrafts.blogspot.com/2011/04/easter-party-link-up.html
http://savvysouthernstyle.blogspot.com/2011/04/wow-us-wednesdays-11-and-my-fresh-cut.html
http://thebrambleberrycottage.blogspot.com/2011/04/time-travel-thursday-41-all-of-creation.html
http://www.atthepicketfence.com/2011/04/sister-saturday-easter-edition.html
http://savvysouthernstyle.blogspot.com/2011/04/wow-us-wednesdays-11-and-my-fresh-cut.html
http://thebrambleberrycottage.blogspot.com/2011/04/time-travel-thursday-41-all-of-creation.html
http://www.atthepicketfence.com/2011/04/sister-saturday-easter-edition.html


Thanks for the tutorial! The blue eggs are beautiful!!!
ReplyDelete...thank you for the lovely feature!!
ReplyDelete~ and the tutorial on egg blowing ~
but,
most of all for the fabulous blue egg inspiration table! Adore the vintage candelabra!!
xo, Rosemary
Julie, I always wanted to know how to do this..so thank you much ma'am!!!
ReplyDeleteThis is great and very helpful!! Thank you!!
ReplyDeleteHi Julie!
ReplyDeleteThank you so much for this tutorial. I was looking for something fun to do with my girls for Easter holiday. They are past the egg dying age (although I am not-lol!) My oldest is off to college next year and my youngest - not that far behind, yet I picked up a kit today at the store to make glitter eggs. Hmmm...is someone having a hard time letting the chikadees grow up? Maybe
Hope you have a greta week.
Hugs,
Sabre'
Your table looks so pretty with your eggs. We actually have a chicken that lays blue green eggs and we love them. They are so pretty.
ReplyDeleteHope you are doing great and staying a good kind of busy with your shop.
I've decided that you are my Etsy angel.
Amy
Beautiful eggs Julie!!!
ReplyDeleteHi Julie,
ReplyDeleteBelieve it or not I was wondering how to do this technique...Yay! Now I know. Thanks for sharing. Can't wait to try it out.
Hugs and Smiles,
♥Ana~A Petite Cottage
NOW I see this about the aspirator? I spent last week blowing my sinuses out the old fashioned way. I made a mess, too, and have little holes on some of them that I forgot to spackle.
ReplyDeleteI love this entire post, and if I have a few minutes before the weekend, I want to try to add a bit more creativity to my boring old painted ones.
Great tutorial! Thanks so much for sharing this. I love the decorated eggs you pictured. Your blue eggs look so pretty in the candlestick holders. What a great idea.
ReplyDeleteTammy
I haven't made hand-blown eggs in years, but your post brings back lots of fun memories! LOVE the eggs on the silver candlesticks, too! Happy Easter to you and yours.
ReplyDeleteYour blue eggs in the candelabra is adorable. I love that scene. Thanks for the tutorial - I've only done hard boiled so I may try it.
ReplyDeleteKaren
Okay. Am I the only one who asks, are the eggs died or naturally blue? Anyway, very very nice instructions and ideas. (coming from Brambleberry's link). Thanks, Jenn
ReplyDeletePS love the wiggly eared bunny at the top! And, great blog name. Jenn
ReplyDeleteThe eggs are lovely.
ReplyDelete~Heidi
Hi Julie,
ReplyDeleteSorry for not getting back to you sooner, been very busy. About my pillows, I paint by hand directly on the fabric using fabric paint and small brushes, it is not a quick or easy process, but I like it better than printing directly on the fabric or using the citra-solve method. The fabric paint you can wash it and nothing will happen to it, the other two options I really don't know. If you need anything else, please let me know, I will be glad to help.
Beautiful table setting!
XXX Ido