Monday, May 30, 2011

Do you have weeds in your garden?


Making progress . . .


and transplanting perennials.

Weeds are currently abundant,
but we are making progress.

The Captain sprays them with Roundup in
early spring and this time of year I love working
in the garden, weeding and transplanting new perennial starts. {But I can't do too much with my reluctant tennis elbows.}

The foxglove seeds love to hide under
a plant or reseed themselves in the gravel path 
and sprout where they have no room to grow.


I'm transplanting them where 
they'll have room to grow and show their 
beautiful blooms in June.
The overcast, rainy days here are 
perfect for transplanting new starts.

Foxglove are tall so I plant them toward the 
middle of the flower beds and leave
room for the shorter plants in front. 
I also plant in groups of three for a bigger show of blooms.

If it's not too hot where you are and still raining,
now is a good time to transplant new perennials.
Just replant the new start and keep it 
watered over the next week and you should 
have a healthy transplant.


new
transplants

Hope you're enjoying your garden in spring!

Friday, May 27, 2011

Garden Pinks


We just returned from a week in
California ~ Great times in the sun with friends ~
 and we came home to these wonderful blooms
in the garden.
I was able to get some pics just before a downpour.

Sharing some pinks today . . .


 Love these Columbines. 
So many different shades of pinks, whites and purples. 
The seeds came from very old plants from my great aunt.


 Thanks for stopping by.
You are always welcome in our garden.
Have a blessed Memorial weekend as
you may be remembering loved ones and
spending time with family.

~ Julie


Wednesday, May 25, 2011

How to Make a Baby Diaper Cake


Today is the Grand Finale of Baby Week!

HOW TO MAKE A DIAPER CAKE

When I wanted to make a diaper cake for my daughter's baby
two years ago, I searched for online tutorials, 
and each one I found gave directions to 
individually roll each diaper and wrap with a rubber band.
In addition to me not wanting to roll 84+ diapers 
with a rubber band and knowing that 
the mother of a newborn does not have time to
unwrap all of those diapers, I came up with a different way,
much easier to make and dismantle.

What you will need:
84+ disposable baby diapers (any size)
white curling ribbon
decorating ribbons (1 spool of each type you want to use)
twist ties
double sided tape
baby items to attach to the cake
{suggested items: pacifier, thermometer, rattle, hand mittens, 
socks, teethers, booties etc.}
and something for the cake topper {stuffed animal, baby shoes, 
small book, etc.}
cake pedestal (optional)


Directions:

Note: I have not counted how many diapers 
I put in each layer; 
you can guess and make them the size you want. 
You can use as many diapers as you want 
to make the cake bigger 
or use different sizes for each layer.
For this cake I used Pampers Newborn Swaddlers 84 pack.

1) Take about 1/2 of the diapers (40-50) for the bottom layer and place on sides and start stacking side by side, making a spiral. Keep them all going in the same direction.


2) When you have them in a nice round, spiral shape, take a piece of white curling ribbon and tie around the center. Tie it as tight as you can (a third hand/finger is helpful here) and cut the ends so they will not show behind the decorative ribbon. If necessary, to make larger, you can add an empty paper towel cardboard roll cut to the diaper height and put in the center.


3) Use about 2/3 of the remaining diapers for the middle layer and 1/3 for the top layer and repeat process of making a spiral circle and tying tight with curling ribbon.


4) Start decorating with your pretty ribbons. I used 1-1/2" wide satin around the middle and then rick rack or smaller ribbon in the center for a double layer effect and added rick rack on the bottom of the layers for a frosted border look. You can do whatever you want. I use a strong double-sided tape {sorry it's out of the package so I can't give you the name of it} to attach the ribbon, but you can attach with Scotch double-sided tape or straight pins if you want. I just like keeping this baby cake kid friendly with no pins.


5) Now you can add the icing on the cake :) with a bunch of little baby gifts. Remove from packaging, if necessary (I put the packaging and directions in a gift bag for the mother-to-be). Most items can be tucked into the diapers with the tags or with a twist tie wrapped around the item. Put things all around the cake so it looks pretty from all sides. I added a lollipop stick and tied the baby mittens to the top with ribbon which looked like little suckers that can be tucked under the side ribbons. You can also tie up onesies with ribbon and use twist ties to attach to the cake and tuck into diapers.


6) Add the cake topper and place on a cake pedestal if desired.


More inspirations and ideas from other cakes . . .


Have fun making your baby diaper cake!

Tuesday, May 24, 2011

Baby Shower clothes pins, gift tags, & confetti


Continuing with Baby Week,
here are a few more quick and easy ideas.
 
How about some clothes pins 
stamped with the baby's name, 
painted a pretty color, 
or decorated with baby papers to match a theme?

These can be used to attach tags to gifts, 
close treat bags, 
hang banners, 
or add magnets to the back and they can hang up 
baby photos or future artwork on a magnetic surface.


Buy a paper punch at your local craft store
and punch your own confetti.
There are tiny baby shapes, hearts, or 
wedding shapes for bridal showers.
So easy and can be punched out of any paper.


Mix papers and punches for a varied look.


To finalize Baby Week, 
my next post will be
HOW TO MAKE A DIAPER CAKE,
a much easier way than the other tutorials I've found online.

Hope you're having a wonderful week!

~ Julie

Behold, children are a gift of the Lord, the fruit of the womb is a reward.    ~ Psalm 127:3

Monday, May 23, 2011

More shower decorations . . . paper flowers


More shower decor for Baby Week.

Today I’m sharing some paper flowers.
I think these were originally inspired by an
Anthropologie window display.

These are easy to make and look great
for decorating a baby or wedding shower.
You can use any paper or color scheme.
 
HOW TO MAKE PAPER FLOWERS
 
  What you will need:
paper (scrapbook, gift wrap, tissue, vintage patterns, 
sheet music, book pages, etc.)
buttons or brads
twist ties or wire
scissors
optional: lace, vintage jewelry, brooches, etc.
 
1) Cut rough shaped squares out of paper from 1" to 6" graduating in size, using 3-9 different types of paper {you can make any size flower you want and use zigzag or other fancy edged scissors}.
 
2) Stack together largest to smallest on top.
 
3) Use scissor point or brad to poke hole in center of all squares.
 
4) Place brad through center hole to finish or use a vintage button and put a twist tie or wire through the button hole on the back side. You can use the twist tie to attach the flower to anything.
 
5) Use your scissors and curl the corners of the bottom 2-3 squares.


Voila!
Pretty paper flowers to add to a package,
table decorations or hang anywhere.
String a bunch together and make a banner.


These look pretty for weddings or showers using lace,
burlap, vintage wedding papers, etc.
Adding a paper bunting or banner with the baby's or bride's name
or quote is also nice for the new mom or bride to keep.


Have fun creating and decorating!
 
[Of course, if you don't want to make your own flowers
or banner, I would be happy to make them for you. 
Just send me an email or 
convo me through etsy for a special order item.]


~ Julie

Thursday, May 19, 2011

How to Make Pom Pom Tissue Flowers


This week is Baby Week on my blog.
I'm doing several different tutorials on shower decorations
that can be used for baby or bridal showers.

Today it's 

HOW TO MAKE POM POM TISSUE FLOWERS

These are different than the ones made popular in the 70's.

What you will need:
8-12 sheets of tissue paper (thin tissue works better 
than heavy-weight)
string, curling ribbon or pipe cleaner
scissors

For this tutorial I used 6 pieces of white tissue paper
cut to 10" x 20" to make a 10" pom pom flower.
You will need 8-10 pieces to make a fuller flower and
probably 12 sheets to make a 20" tissue flower.
Whatever width you choose will be the size of your flower.

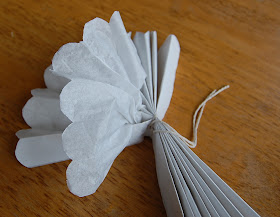
Fold your pieces into a fan with about 1" pleats.

Fold in half to find center and then tie with string, 
curling ribbon or pipe cleaner.
Determine the length of string or ribbon 
if you want to hang the flower.
You can tie string to the pipe cleaner after finishing the flower 
if using a pipe cleaner.


Cut each end of the fan ~ 
a point to make a pointed tip flower or 
curved for round petals.

Now for the hard part . . . . .
Start separating each piece of tissue paper,
being careful not to tear the tissue.
Continue separating the fan and pulling each piece 
and fluffing as you go.
Repeat on other side.

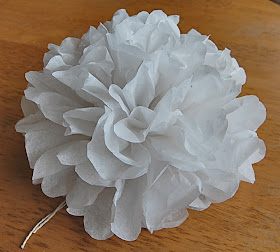
Voila!
Now you can make your own!
You can leave one side flat for lying on surfaces 
or make round like a ball.
These look beautiful displayed on tables 
or hung for decorating.

Have fun decorating for your next event.

Next tutorial: flat paper flowers.

~ Julie